Creating a Dynamic “Blend Shader” in Unity, Part 2

  • Part I – Creating a basic shader
  • Part II – Creating a blend shader (You are here)
  • Part III – Extending the blend shader (normal map, metallic map, specular map, etc.)  (Coming Soon)

    Part II – Creating a blend shader

Hello, and welcome back to our series on writing Unity Standard Surface Shaders.

Last time we went over the basics of writing a Unity Standard Surface Shader that would control the surface color of an object. Today we are going to add support for transparency, add support for applying a bitmap texture, and then add support for blending between two bitmap textures.

Adding Transparency

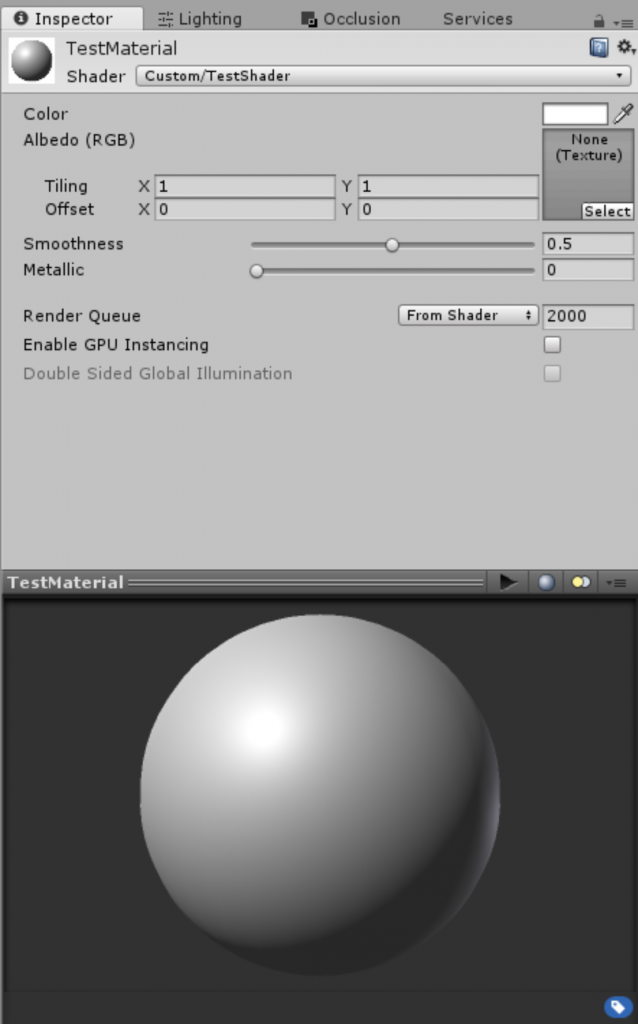
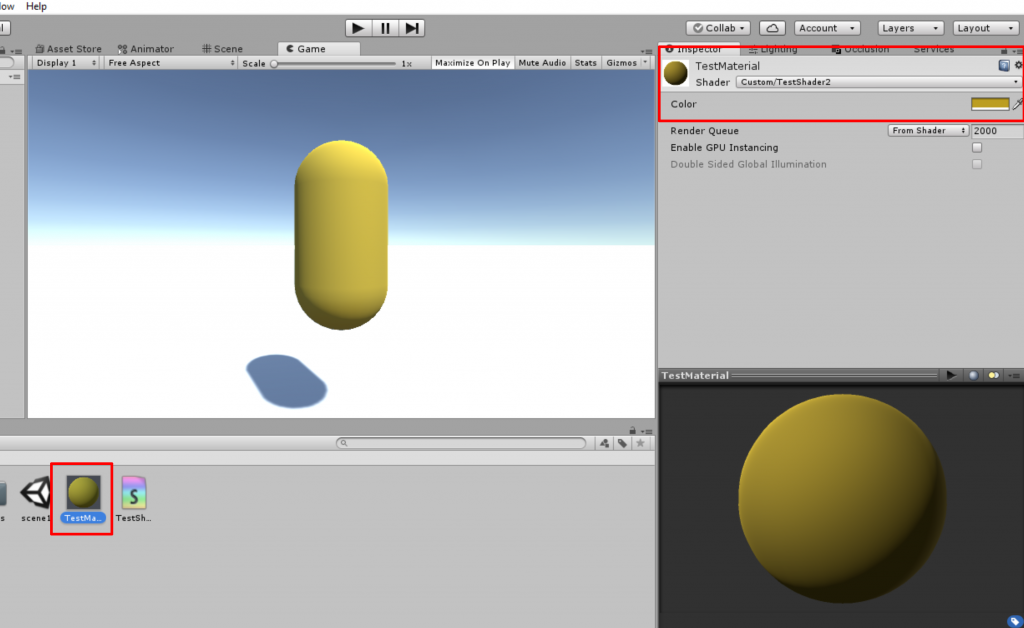
If you recall from last time, we ended up with a simple shader that can only control an object’s surface color, as seen below.

The basic shader from Part 1 controls surface color.

The shader code we ended up with last time was this:

Shader "Custom/TestShader2" {
     Properties {
          _Color ("My Color", Color) = (1,1,1,1) // The input color exposed in the Unity Editor, defined as type "Color" and set to rgba 1,1,1,1 (solid white) 
     }

     SubShader {
          Tags { "RenderType"="Opaque" } 

          CGPROGRAM
          // Physically based Standard lighting model,
          // enable shadows on all light types
          #pragma surface surf Standard  

          // This Input struct is required for the "surf" function
          struct Input {
               float2 x;
          };

          fixed4 _Color; // A variable to store rgba color values
          // This "surf" surface function with this signature is required
          // It is executed for each pixel of the objects with this shader
          void surf (Input IN, inout SurfaceOutputStandard o) {
               // Albedo comes is tinted by a color
               fixed4 c = _Color; // Get the _Color value
               o.Albedo = c.rgb; // Set the "Albedo" or diffuse color rgb

          }
          ENDCG
     }
     FallBack "Diffuse" // Revert to legacy shader if this shader-type not supported
}

Let’s add support for transparency by changing a few lines our code. First, update the “Tags” line and change from using the “Opaque” queue to the “Transparent” queue:

Tags {"Queue"="Transparent" "RenderType"="Transparent" }

This lets the rendering engine know the order in which to render this object and that it should be rendered with the transparent objects after the opaque objects. Next, update the #pragma surface… directive to include the “alpha” keyword.

#pragma surface surf Standard alpha

Finally, update the surf() surface function to apply the alpha value of the _Color input property:

o.Alpha = _Color.a;

We now have the following shader code:

Shader "Custom/TestShader3" {
    Properties {
        _Color ("Color", Color) = (1,1,1,1)
    }
    SubShader {
        Tags {"Queue"="Transparent" "RenderType"="Transparent" } 
        
        CGPROGRAM
        // The "alpha" keyword is added to the surface directive
        #pragma surface surf Standard alpha
          
        struct Input {
            float2 x;
        };
         
        fixed4 _Color;
          
        void surf (Input IN, inout SurfaceOutputStandard o) {
            // Albedo comes from a texture tinted by color
            fixed4 c = _Color;
            o.Albedo = c.rgb;  
            o.Alpha = _Color.a;
        }
        ENDCG
    }
    FallBack "Diffuse"
}

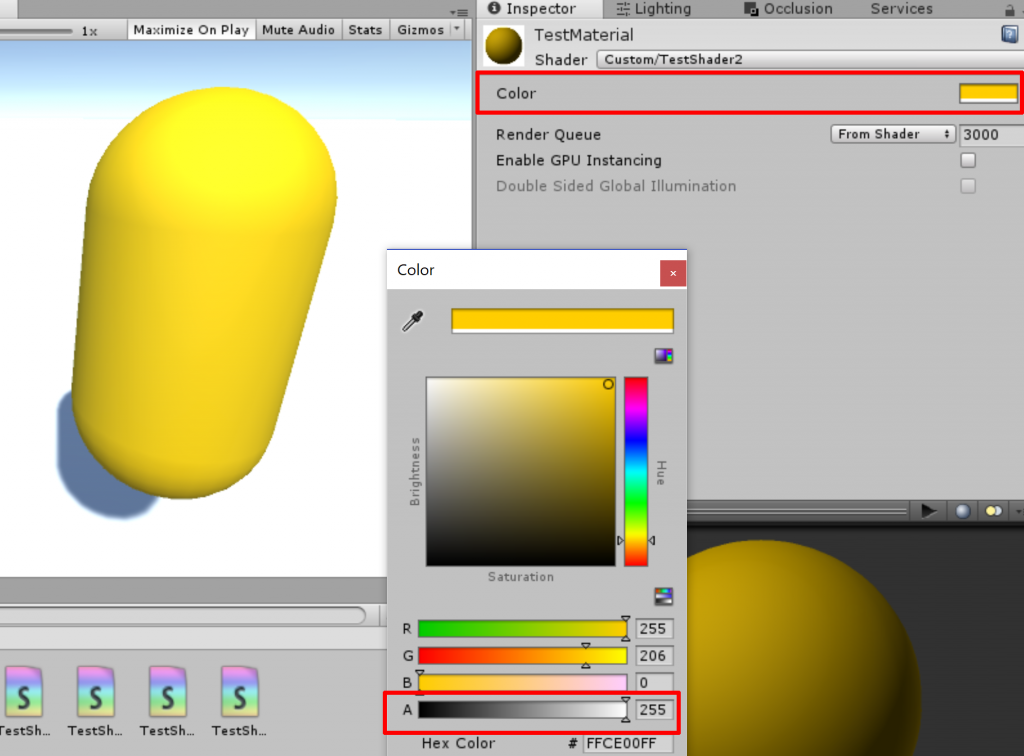
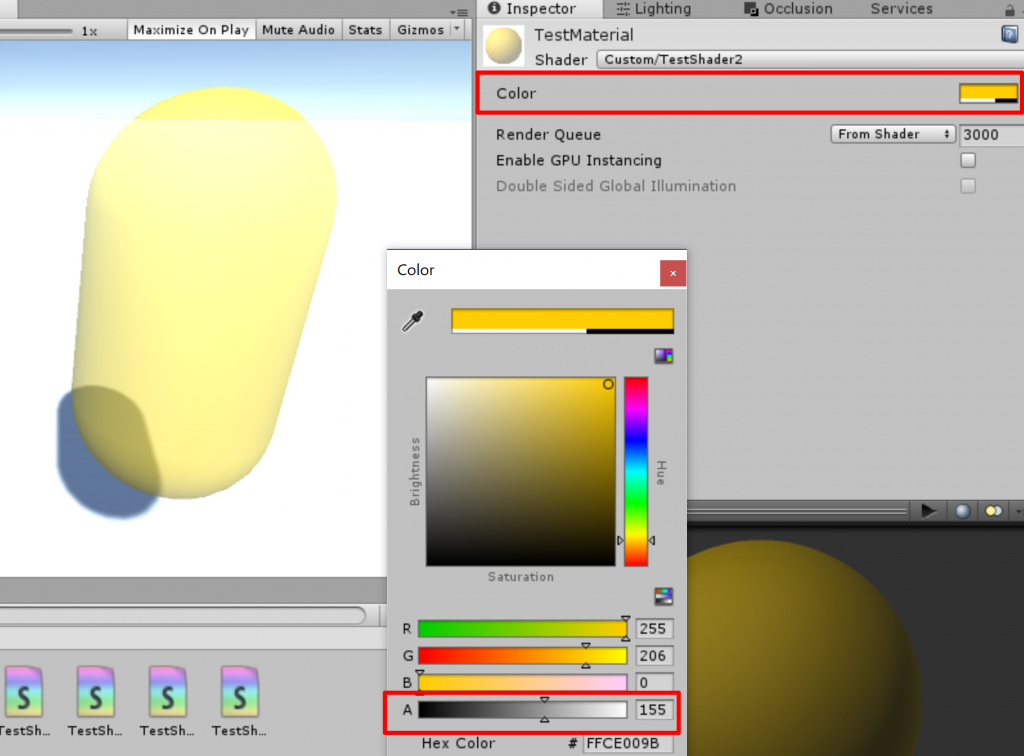
Change the name to “TestShader3” and then save this file as TestShader3.shader. When create a new Material with this shader and apply it to an object, we can now control the object’s transparency by manipulating the alpha value of the Material’s color property.

The shader now supports transparency.

Adding a bitmap texture

Colors are great and all, but surfaces look much more interesting when we can apply bitmap textures to them, so let’s do that next.

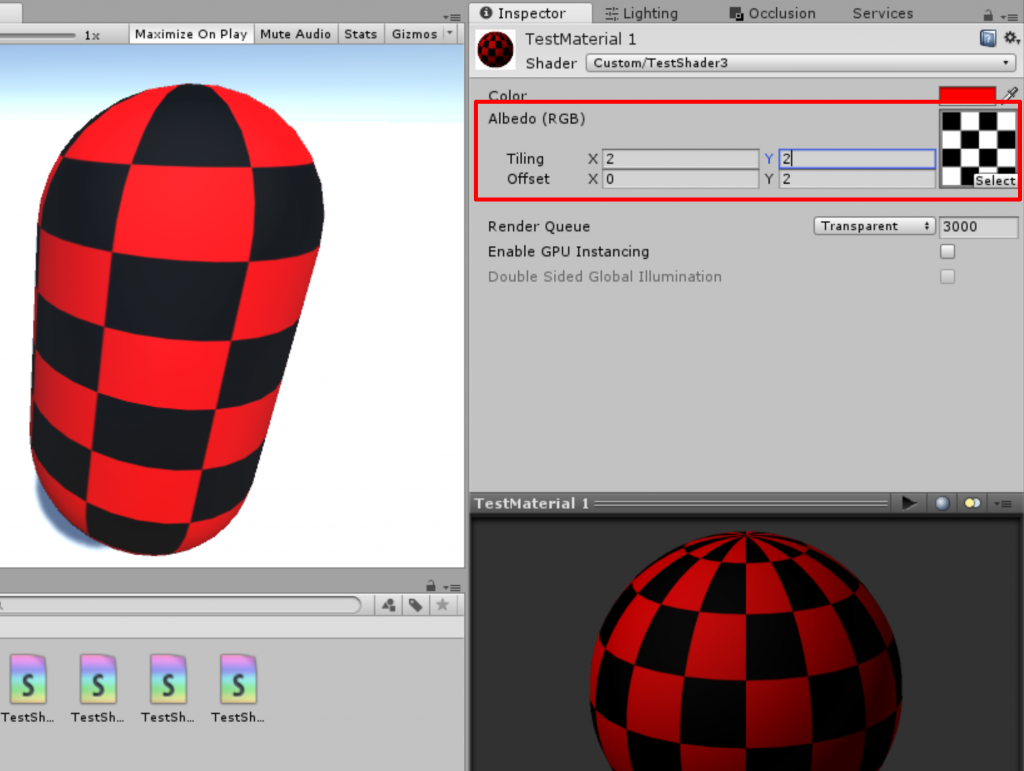
Within the Properties block at the top, add a new input property called _MainTex:

_MainTex ("Albedo (RGB)", 2D) = "white" {}

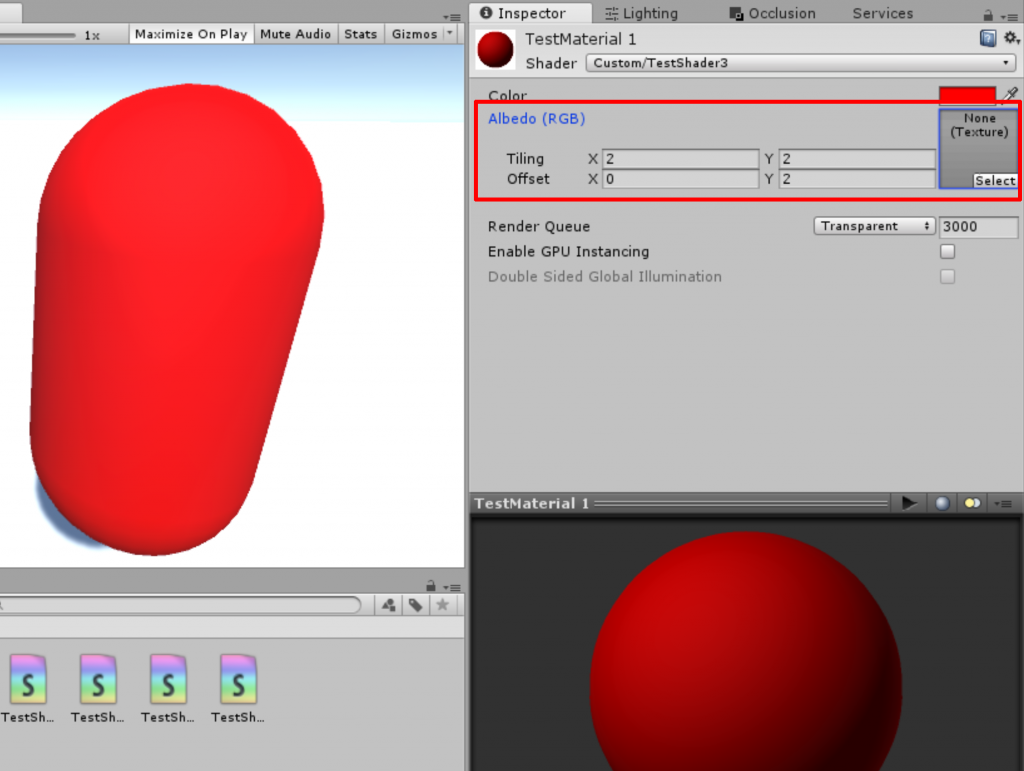
We have given the var a type of “2D” (which is an 2D image texture) and set the default value as a solid white image. The name of this property in the Unity Inspector will be “Albedo (RGB)”. Remember, albedo is the term used for the un-shaded surface color of an object. If you save this file as a new shader and then apply it to a Material in unity, you can see there is now an “Albedo (RBG)” property that accepts an image.

We now have the "Albedo (RBG)" property exposed in the editor.
We now have the “Albedo (RBG)” property exposed in the editor.

However, this image will not be visible on your material because it is not being applied in the surface function. In order to do this, first update the Input struct to handling the input texture:

struct Input {
     float2 uv_MainTex;
};

Now the input structure of a surface shader requires that the texture coordinates be named starting with either “uv” or “uv2” and then should correspond to your input property name.

We then must add a variable to handle input property, just as we did for _Color. Since this main texture property is an image, we will use the type sampler2D:

sampler2D _MainTex;

Great! Now we are ready to alter the heart of the surf() surface function in order to apply this bitmap.

void surf (Input IN, inout SurfaceOutputStandard o) {
     fixed4 c = tex2D (_MainTex, IN.uv_MainTex) * _Color;
     o.Albedo = c.rgb; 
     o.Alpha = c.a;
}

Take a look at the line fixed4 c = tex2D (_MainTex, IN.uv_MainTex) * _Color; which is what applies the texture. As you can see, we pass the texture property _MainTex and the uv_MainTex input struct to the built-in tex2D() function and then multiply that by the _Color property. The tells the shader that for each pixel on the object, get the image pixel color at this location and apply the chosen color. This value is stored in the c variable, which is then applied to the o.Albedo and o.Alpha properties. Simple!

Now we can apply a bitmap texture to our Material.

Cool, we now have a basic surface shader that allows us to support color, transparency, and a bitmap texture.

Shader "Custom/TestShader3" {
    Properties {
        _Color ("Color", Color) = (1,1,1,1)
        _MainTex ("Albedo (RGB)", 2D) = "white" {}
    }
    SubShader {
        Tags {"Queue"="Transparent" "RenderType"="Transparent" } 
         
        CGPROGRAM

        // Physically based Standard lighting model
        #pragma surface surf Standard alpha
        struct Input {
            float2 uv_MainTex;
        };
         
        fixed4 _Color; 
        sampler2D _MainTex;

        void surf (Input IN, inout SurfaceOutputStandard o) {
            // Albedo comes from a texture tinted by color
            fixed4 c = tex2D (_MainTex, IN.uv_MainTex) * _Color;
            o.Albedo = c.rgb; 
            o.Alpha = c.a;
        }
        ENDCG
    }
    FallBack "Diffuse"
}

Blending between two bitmaps

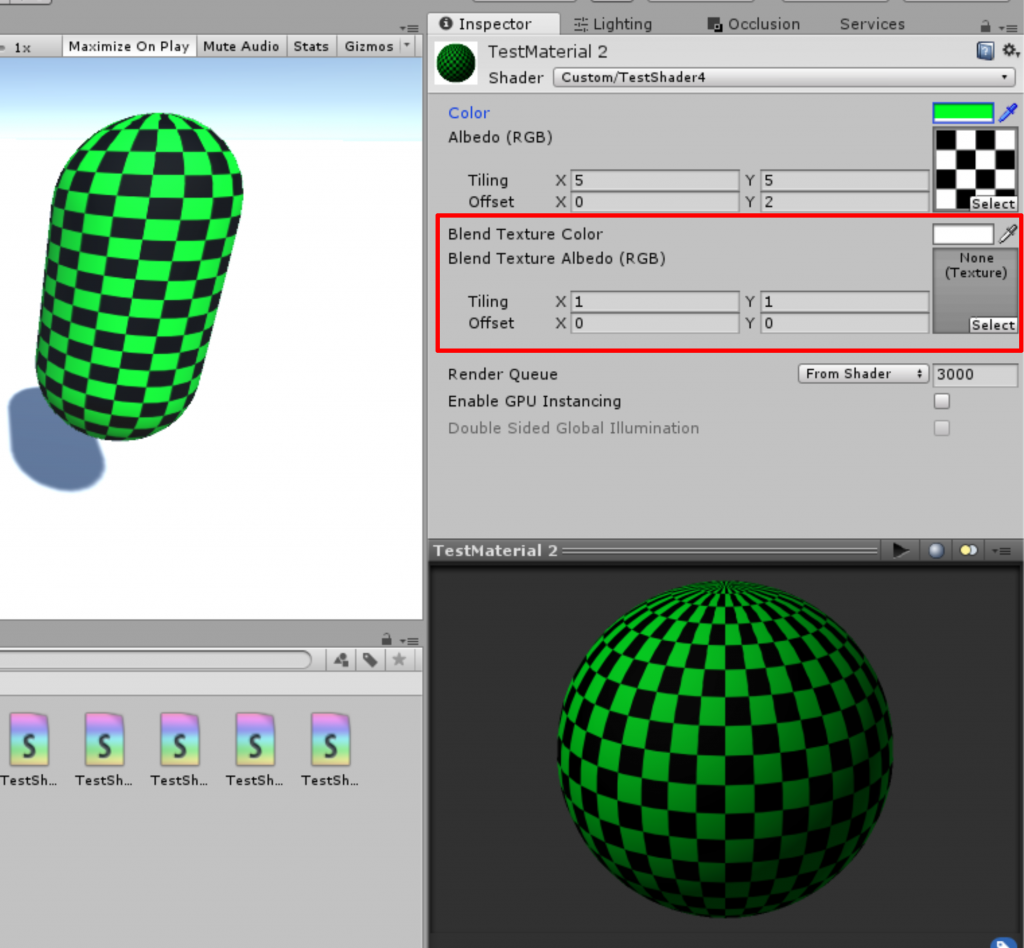
Now let’s start add a second bitmap texture to the shader for blending. In the Properties block of the shader add new properties for _BlendColor and _BlendTex, which are basically duplicates of the existing _Color and _MainTex properties.

// The Blend texture
_BlendColor ("Blend Texture Color", Color) = (1,1,1,1)
_BlendTex ("Blend Texture Albedo (RGB)", 2D) = "white" {}

If we save this to a new shader file and apply that to a Material in Unity, we can see the new properties in the Inspector.

The new Blend properties are visible now.
The new Blend properties are visible, now.

We then need to add the new bitmap variable texture coordinates into the Input struct:

struct Input {
     float2 uv_MainTex;   // This line was already present
     float2 uv_BlendTex;
};

Next we need to make sure we have variables inside the shader to handle the new properties. After the line fixed4 _Color; add variables to handle the new Properties.

fixed4 _Color;      // This line was already present
sampler2D _MainTex; // This line was already present
fixed4 _BlendColor; 
sampler2D _BlendTex;

Finally, in our surf() function, we need to calculate the the new blend inputs and then add them to the original texture and color values.

void surf (Input IN, inout SurfaceOutputStandard o) {
      
     fixed4 c = tex2D (_MainTex, IN.uv_MainTex) * _Color;
     fixed4 b = tex2D (_BlendTex, IN.uv_BlendTex) * _BlendColor;
    
     o.Albedo =  (c.rgb) + (b.rgb);  
     o.Alpha = (c.a) + (b.a); 
}

But wait! Something is wrong. The textures don’t blend properly and when we make the object semi-transparent, we see shadow color is bright:

Something isn't quite right here!
Something isn’t quite right here!

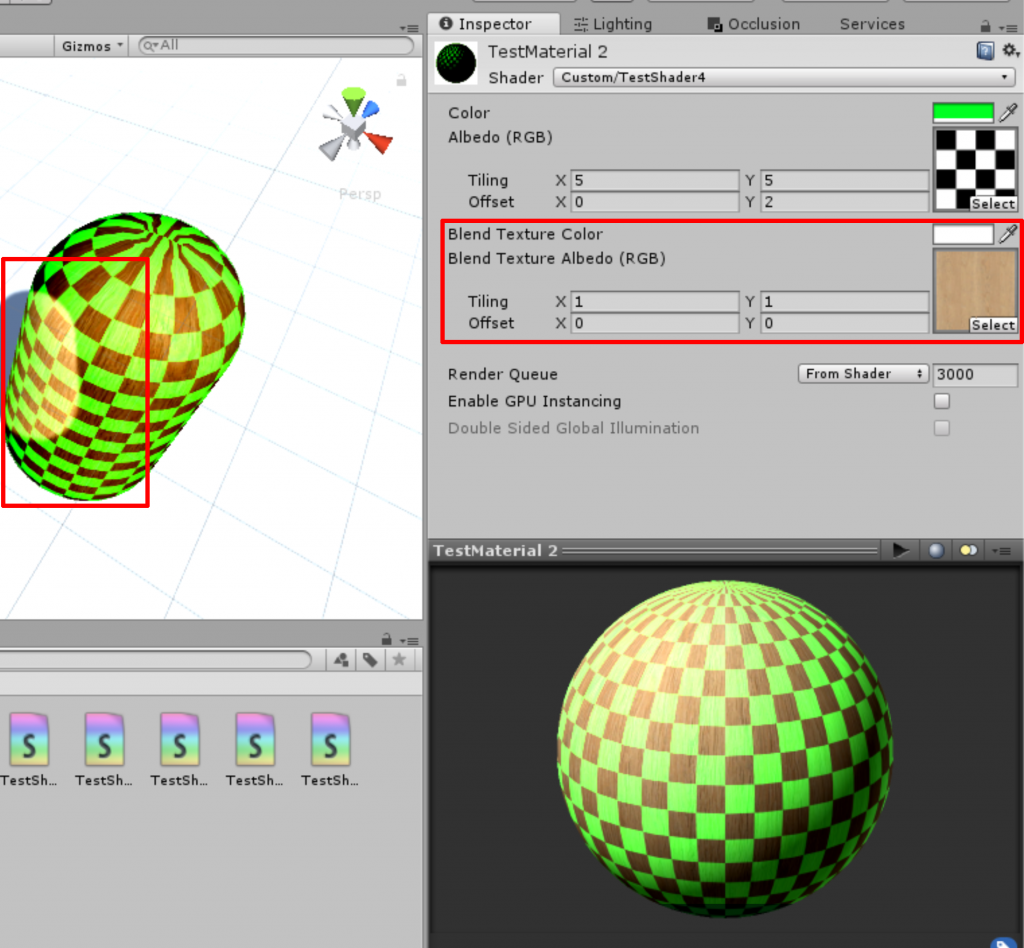
Simply adding the two colors together doesn’t produce the desired effect, which is a nice blend between two textures. What we need is a way to control the amount of contribution from each texture so we can smoothly transition between 100% Texture A to 100% Texture B. We will do that by adding another Property called _Blend that will be a float value from 0-1.

_Blend ("Blend Textures Amount", Range(0.0,1.0)) = 0.0

This will create a range slider in the Inspector allowing the user to input values between 0.0-1.0. For our purposes 0 will mean show 100% of the main texture and 1.0 will show 100% of the blend texture. A value of 0.5 will display a 50/50 mix between both textures.

Finally, we need to add a half _Blend; declaration to handle this new variable and then update our surf() function to make sure it properly combines the main texture with the blend texture at the specified percentages:

void surf (Input IN, inout SurfaceOutputStandard o) {
     // Albedo comes from a texture tinted by color
     fixed4 c = tex2D (_MainTex, IN.uv_MainTex) * _Color;
     fixed4 b = tex2D (_BlendTex, IN.uv_BlendTex) * _BlendColor;
     
     // Set the Albedo and alpha to the main texture combined with the blend texture based on the blend amount
     o.Albedo =  (c.rgb * (1-_Blend)) + (b.rgb * (_Blend)); 
     o.Alpha = (c.a * (1- _Blend)) + (b.a * _Blend);
}

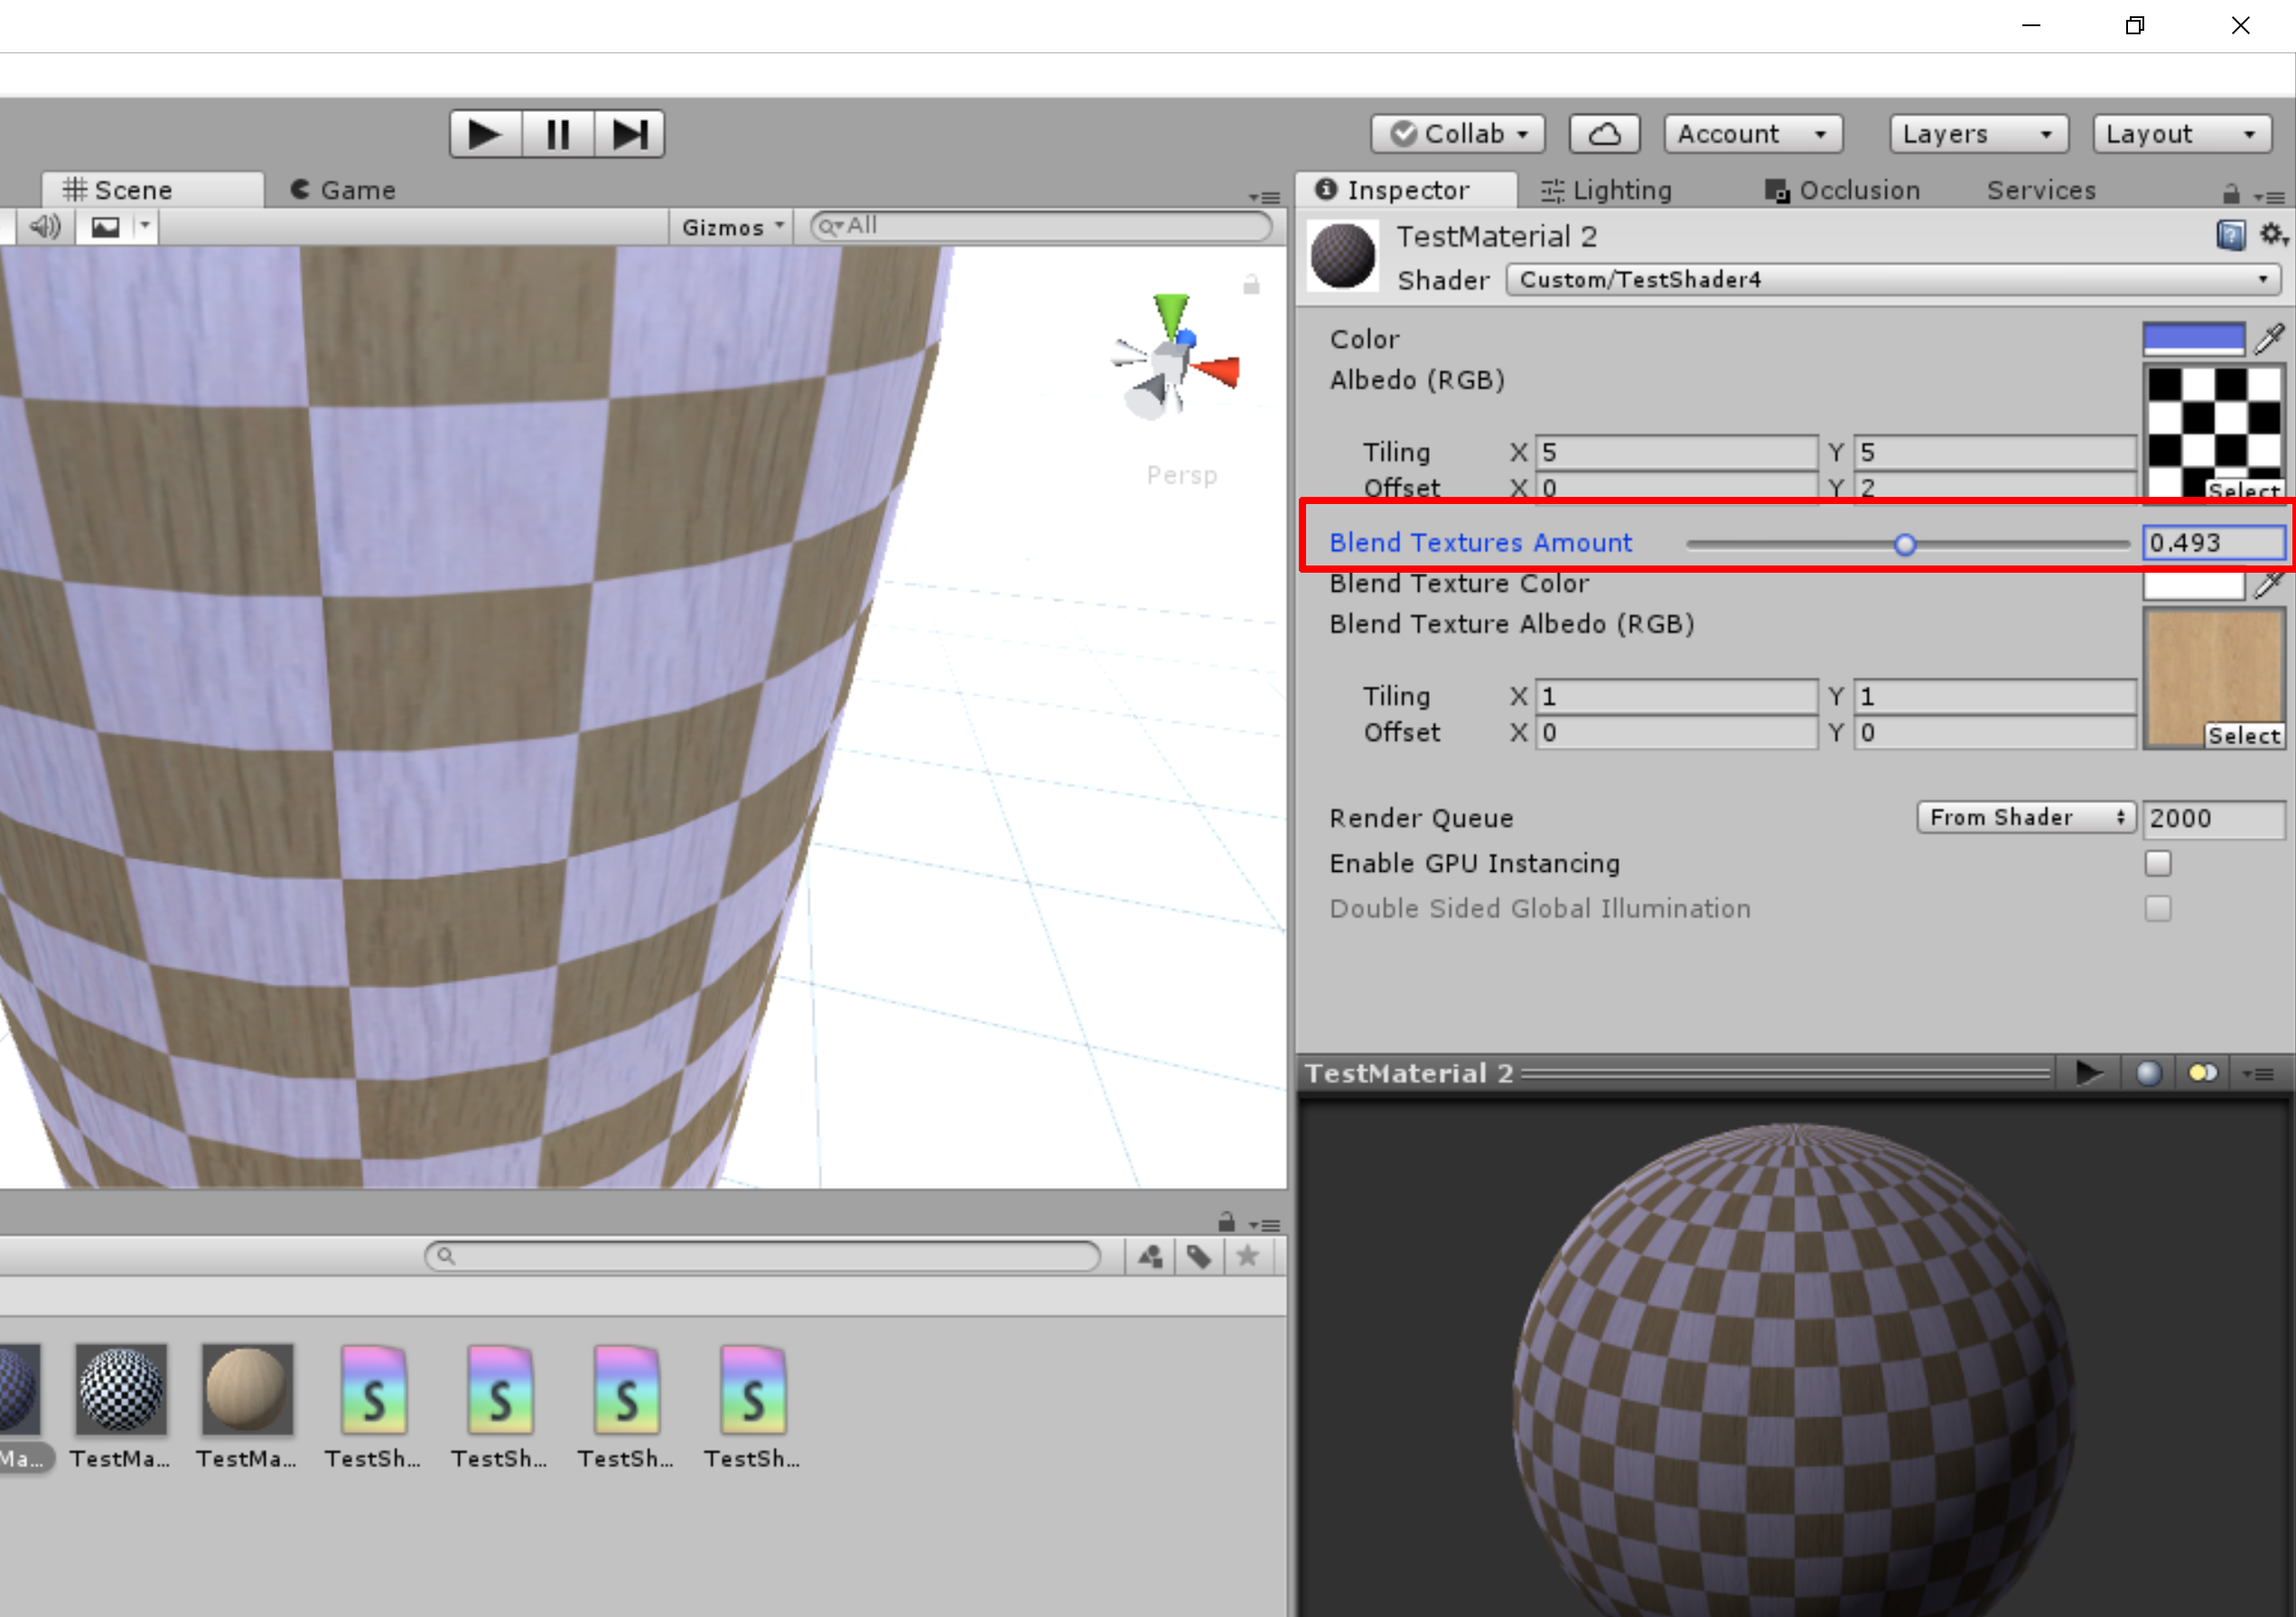
Our function now blends the proper percentages between the main and blend textures depending on the slider value. Let’s test it by blending a semi-transparent, green-tinted checkerboard texture with an opaque, non-tinted wood texture.

The updated shader properly blends between the two textures.

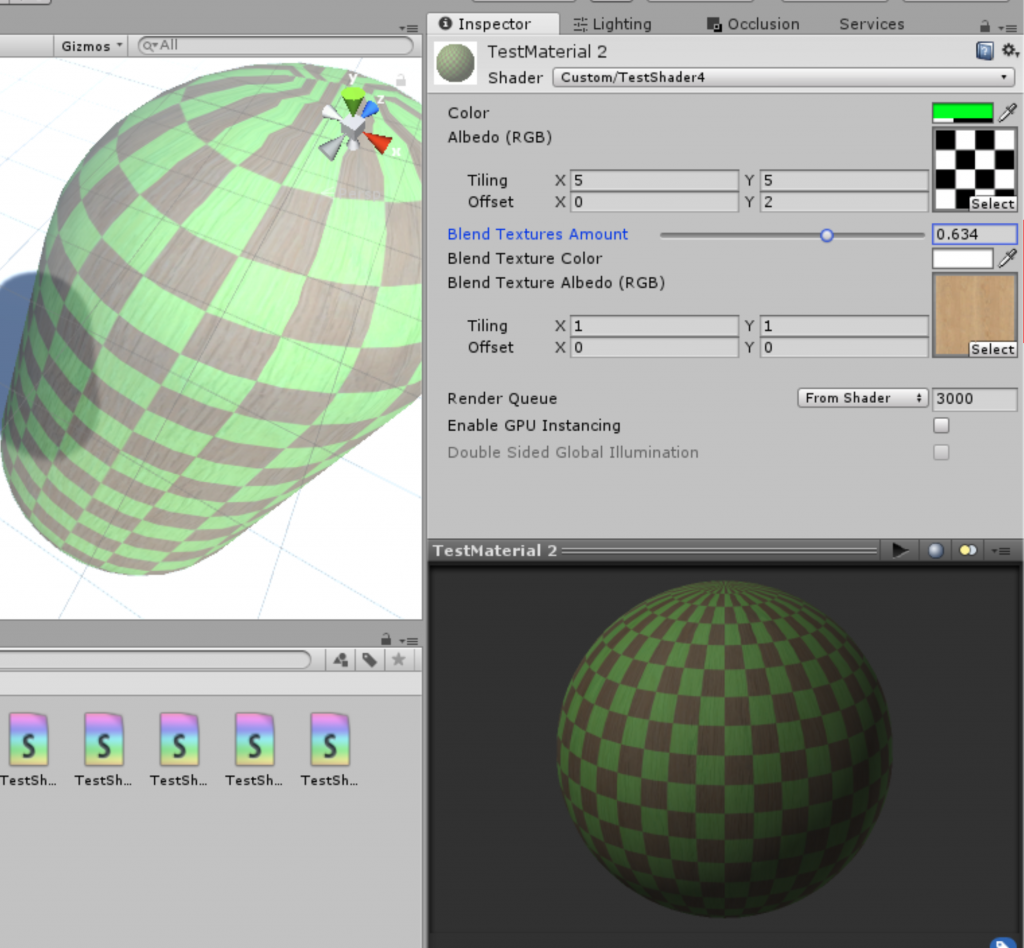
The completed (basic) blend shader

We now have a shader that allows us to blend smoothly between two bitmap textures including individual color and alpha value support!

A shader that allows blending between two textures.

The completed shader code:

Shader "Custom/TestShader4" {
    Properties {
        _Color ("Color", Color) = (1,1,1,1)
        _MainTex ("Albedo (RGB)", 2D) = "white" {}

        // The blending texture blend amount
         _Blend ("Blend Textures Amount", Range(0.0,1.0)) = 0.0

        // The Blend texture
        _BlendColor ("Blend Texture Color", Color) = (1,1,1,1)
        _BlendTex ("Blend Texture Albedo (RGB)", 2D) = "white" {}
    }
    SubShader {
        Tags {"Queue"="Transparent" "RenderType"="Transparent" } 
        
        CGPROGRAM

        // Physically based Standard lighting model
        #pragma surface surf Standard alpha  

        struct Input {
            float2 uv_MainTex;
            float2 uv_BlendTex;
        };
         
        fixed4 _Color;
        fixed4 _BlendColor;
        sampler2D _MainTex;
        sampler2D _BlendTex;
        half _Blend;

        void surf (Input IN, inout SurfaceOutputStandard o) {
            // Albedo comes from a texture tinted by color
            fixed4 c = tex2D (_MainTex, IN.uv_MainTex) * _Color;
            fixed4 b = tex2D (_BlendTex, IN.uv_BlendTex) * _BlendColor;
            o.Albedo =  (c.rgb * (1-_Blend)) + (b.rgb * (_Blend));
            o.Alpha = (c.a * (1- _Blend)) + (b.a * _Blend);
        }
        ENDCG
    }
    FallBack "Diffuse"
}

That’s pretty awesome! Join in next time when we will add support for all the shader features you know and love like normal maps, specular maps, emission maps, etc. See you soon!

Creating a Dynamic “Blend Shader” in Unity, Part 1

Hello and welcome to the first in what will become a series on esoteric Unity subjects that came up during the making of our game, Placebo Effect. Today, I will talk about my journey into learning how to create customized Unity shaders in HLSL (High Level Shading language). For those unfamiliar with 3d shaders, they are used to control the way surfaces look on 3d objects. Shaders apply colors, textures and image effects to Materials and can create many highly detailed and interesting visual effects in an efficient manner.

  • Part I – Creating a basic shader (You are here)
  • Part II – Creating a blend shader
  • Part III – Extending the blend shader (normal map, metallic map, specular map, etc.)  (Coming Soon)

    Part I – Creating a basic shader

In our game, we have a variety of organic objects and we wanted them to be able to slowly change to a damage-texture over time based on the object’s health. The goal was to smoothly transition between the non-damage texture to the damaged texture. I assumed that it would be easy to find a shader that would allow me to control the amount of blend between two textures but I didn’t find any suitable ones out there so I decided to write my own (despite having no previous shader knowledge or experience). I wanted to be able to mix textures like this:

A shader that allows blending between two textures.
I wanted to create a shader that allows blending between two textures.

Here is how I went about creating the blend shader of my dreams (if you just want to grab the code, skip to Part II). I started by creating a new Unity 3D project  named “ShaderTest”. In the new scene that is created by default, I created a capsule to test out our new shaders. I then created a new shader by right-clicking in the project window and choosing:

Create > Shader > Standard Surface Shader

I  named the new shader “TestShader”.

Create a new Standard Surface Shader.

As you can see, there are several types of shaders, but all we care about for now is the Standard Surface Shader. Now, create a new Material so we can test out our shader. Select the newly created Material, then choose “Custom/TestShader” from the top of the Inspector panel.

Choose the newly created Shader in the Material's Inspector panel.
Choose the newly created Shader in the Material’s Inspector panel.

Note how the newly created Material with the new TestShader already has some default parameters shown, such as “Color”, “Abedo (RGB)”, “Smoothness”, and “Metallic”. This is because these properties are built into the default shader template file.

Some properties are already created for you in the default shader template.

Now, double-click the TestShader file to open it in Visual Studio (or your text-editor of choice) and look at the “Properties” block at the beginning of the file:

Properties {
     _Color ("Color", Color) = (1,1,1,1)
     _MainTex ("Albedo (RGB)", 2D) = "white" {}
     _Glossiness ("Smoothness", Range(0,1)) = 0.5
     _Metallic ("Metallic", Range(0,1)) = 0.0
}

Notice how these properties match the one’s exposed in the Unity editor, and the names given to them in quotes (“Color”, “Smoothness”, etc.) become the property descriptions in the Unity editor. (For more info on writing surface shaders, go here).

Standard Surface Shader Basics

For the simplicity of our discussion we are going to remove all of this automatically generated code and strip our shader down to the basics. Let’s start by creating a shader that does nothing but control the surface color of an object, the complete shader will look like this:

Shader "Custom/TestShader2" {
     Properties {
          _Color ("My Color", Color) = (1,1,1,1) // The input color exposed in the Unity Editor, defined as type "Color" and set to rgba 1,1,1,1 (solid white) 
     }

     SubShader {
          Tags { "RenderType"="Opaque" } 

          CGPROGRAM
          // Physically based Standard lighting model,
          // enable shadows on all light types
          #pragma surface surf Standard  

          // This Input struct is required for the "surf" function
          struct Input {
               float2 x;
          };

          fixed4 _Color; // A variable to store rgba color values
          // This "surf" surface function with this signature is required
          // It is executed for each pixel of the objects with this shader
          void surf (Input IN, inout SurfaceOutputStandard o) {
               // Albedo comes is tinted by a color
               fixed4 c = _Color; // Get the _Color value
               o.Albedo = c.rgb; // Set the "Albedo" or diffuse color rgb

          }
          ENDCG
     }
     FallBack "Diffuse" // Revert to legacy shader if this shader-type not supported
}

If you copy this code into a file named TestShader2.shader, and then apply this new “TestShader2” shader to a new Material, you will see now a simplified set of properties in the Inspector. You can see that only the “Color” property is exposed.

Notice how this basic shader now only has the "Color" property exposed.
Notice how this basic shader now only has the “Color” property exposed.

Let’s break down each part of this shader file to understand what is happening. The first part of the file defines a new Shader, and the part in quotes informs you of the Shader’s name and folder location in the Material’s Shader selection drop-down.

Shader "Custom/TestShader2" { }

Next comes the “Properties” section which defines input properties for the shader. Our shader exposed a variable named _Color with the type of fixed4. This datatype hold four fixed floating point values representing a pixel’s Red, Blue, Green, and Alpha color channels.

Properties {
     // The input color exposed in the Unity Editor, defined 
     // as type "Color" and set to rgba 1,1,1,1 (solid white) 
     _Color ("My Color", Color) = (1,1,1,1)  
}

Next comes the Subshader block. Every surface shader has its code placed inside a “SubShader” block.

SubShader { }

Now, we have:

Tags { "RenderType"="Opaque" }

This tells the rendering engine the z-depth order in which to render this object, as unity renders opaque objects, transparent objects, and effects in a specific order. When dealing with transparent objects, the rendering engine needs to know that these get rendered after opaque objects at the same z-depth. For our purposes today, we will use Opaque.

Next, comes this structure:

CGPROGRAM .. ENDCG

The core of the shader will be in this CGPROGRAM .. ENDCG block.

Then we have the #pragma surface directive:

#pragma surface surf Standard

The pragma keyword tells the compiler it is about to receive some special instructions. The #pragma surface directive has the following form:

#pragma surface surfaceFunction lightModel [optionalparams]

Note the surface keyword at the beginning and then the definition of the surfaceFunction. In our shader, we have defined this function name here as “surf” and then defined the “surf()” function down below. The other required parameter is the lightModel, which can be of type Standard, StandardSpecular, BlinnPhong, Lambert, or a custom model that you provide (more information on these properties is available here).

Next, we create the “Input” struct which is required for our “surf()” function. I define an x variable here because I need something just to create the struct, this x variable is not actually used.

struct Input {
     float2 x;
};

Next we need a definition of the _Color variable, which is needed to take the color value _Color from the input properties at the top. These variable names must match.

fixed4 _Color;

Now we come to the fun part, the “surf()” function that applies color to each pixel.

void surf (Input IN, inout SurfaceOutputStandard o) {
     ...
}

You can see we have the “Input” struct being passed in as well as the “o” output parameter which we will use inside the function to control the surface color.

We have now reached the meat of the shader, the code inside the surface function:

fixed4 c = _Color; // Get the _Color value
o.Albedo = c.rgb; // Set the "Albedo" or diffuse color rgb

As you can see, we simply get the “_Color” variable’s value and the apply the RGB component to the “o” variable’s “Albedo” property which controls unlit surface color. The “Standard” surface shader’s output object has the following properties:

fixed3 Albedo;      // base (diffuse or specular) color
fixed3 Normal;      // tangent space normal, if written
half3 Emission;     // Emission (surface lighting) color 
half Metallic;      // 0=non-metal, 1=metal
half Smoothness;    // 0=rough, 1=smooth
half Occlusion;     // occlusion (default 1)
fixed Alpha;        // alpha for transparencies

As you can see, we have just barely scratched the (wait for it…) surface in writing Unity Standard Surface Shaders, but I hope this was a good introduction to the basics. Next time, we will look at adding a bitmap texture to this shader and then blending between two bitmaps in the same shader.

Part II – Creating a blend shader